Did you know you can use a Webex chatbot for report delivery? In addition to scheduling reports for email and local repository delivery, a chatbot can send reports to you or a group of users. Learn how to create your Variphy Webex chatbot below!
How to Create Your Variphy Webex Chatbot
Step 1: Log in to your Webex account
Go to Webex for Developers and log in with your Webex account credentials.

Step 2: Create your Webex bot
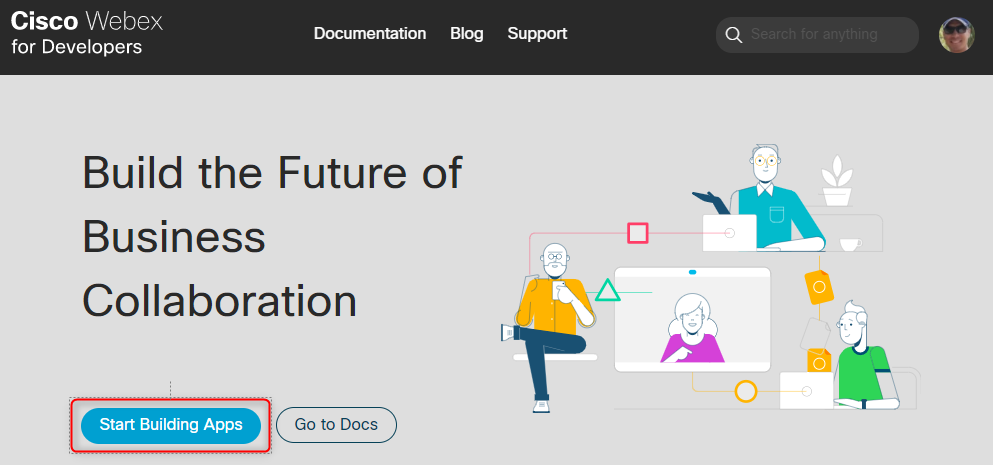
Once logged in, click the Start Building Apps button, as shown below.
Pro tip: You can also visit https://developer.webex.com/my-apps/new/bot and then skip to Step 3 below.
On the following screen, click the Create a New App button.

Then, click the Create a Bot button.

Step 3: Configure & personalize your Webex Bot
Enter a name and username for your new chatbot, and then select an icon.

Include a description for your bot, then click the Add Bot button.

Step 4: Get the bot access token
Each Webex bot has a single access token, which is essentially the password required for any software to use (send messages via) the bot. Handle the bot access token like any other password and follow your organization’s security and compliance requirements.
Once your bot has been successfully created in Webex, the resulting screen will display the bot access token, name, and username.
The bot access token will be a long string of numbers, letters (upper and lower case), and possibly other characters, which makes it very difficult, if not impossible, to guess.
Click the Copy Token button to copy the bot access token to your desktop clipboard and save it. The bot access token will not be shown again.
It’s also a good idea to note/confirm the bot username, as you will need it in the next step.

Regenerate Access Token
The bot access token will only be displayed once. If you lose or need to reset it, Webex only allows you to regenerate a token.
If you revisit the Webex Bot’s configuration page, you will only have the option to reset the access token by clicking the Regenerate Access Token button.
This will invalidate the previous access token, so only perform this action if necessary and update the bot configuration in Variphy accordingly.

Congrats! You’ve Created your Webex Bot!
The next steps will walk you through how to allow your new Webex Bot to send messages directly to Webex Spaces and users in your organization.
How to Add/Authorize the Variphy Webex Bot to an Existing Webex Space
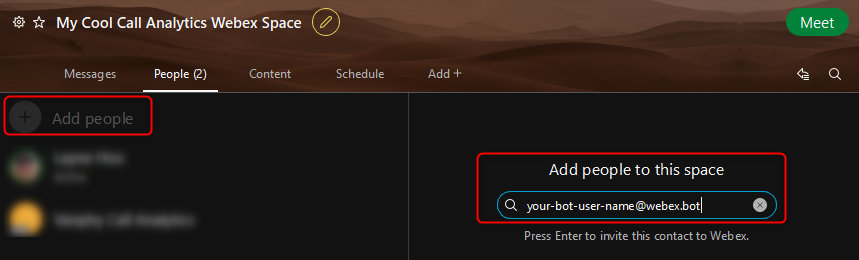
To add your bot to an existing Webex Space, click the Add People button within the People tab.
Enter the username for your Webex bot, which should look like an email address in the form of your-bot-user-name@webex.bot, and click the Add button.
How to Authorize the Variphy Webex Bot to Message Direct Webex Users
Authorizing Webex Bots to interact directly with users is a little different than for Webex Spaces.
For security and privacy purposes, all users must individually initiate a conversation with the Webex Bot to authorize it.
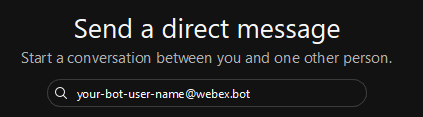
At the top of the Webex Client, click the + symbol and then select Send a direct message from the menu.

In the search field, enter the username for your bot, which should look like an email address in the form of your-bot-user-name@webex.bot.
The user must send a message to the bot to authorize access.
Once this has been completed, the Webex Bot can send messages to the user.
Ready To Use Your New Webex Bot?
My next post will cover how to enable and use the Webex bot. Can’t wait? Check out the Variphy report and alert delivery via Webex ChatBot webinar here!